I'm so pleased to read your comments. I love hearing from readers! But I have tried to reply to several of you today, only to see that you are "no reply bloggers". Now I respect the fact that you are entitled to your privacy! Really, I do! But I think that most "no reply" people don't realize that their settings are what they are.
I always try to send an email reply to everyone who comments to one of my blog posts. (Sometimes I get overwhelmed, but I do try).. If you commented and didn't hear from me, there's a good chance that you have your privacy settings such that I can't contact you.
SOOOOO..... if you win...... I can't send you an email! This is ok with me, but if a no-reply person wins, I'll post their name in a blog post- and if they don't happen to see it and contact me in a few days, I'll have to select another winner.
Make sure I can reply to you.... or make sure you check back on ANY blog if you enter a drawing.
This is just a thought.... but if you really don't want your email address out there on the internet, and if you like to keep your email uncluttered, you might consider opening a different email account (a free one like yahoo or gmail or many others). Then just keep that one for "junk" or newsletters and blog posts. A lot of people do that. (Just make sure you check it once in a while, though!)
Wednesday, December 31, 2014
Giveaway- Tradewinds Pattern (Ends Jan 15, 2015)
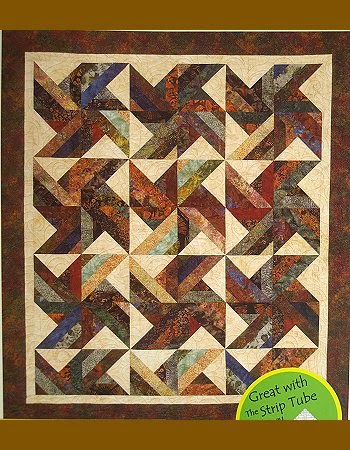
For the month of January, I'll putting this pattern and the Strip Tube Ruler on sale on my website.
There are lots of ways to gain entries. For one entry in the drawing, all you have to do is comment to THIS POST that you would like to be entered. That's it!
For extra entries, you MUST make ADDITIONAL comments! (So I can keep count of them).
For extra entries, you may do any or all of the following:
*Be a follower of this blog. You can be a long-time follower, or a brand new one.
*Help spread the word. You may have one entry for each DIFFERENT post telling others about the giveaway. You may post about the giveaway on your own blog, do a Facebook post, tweet, or whatever. Just spread the word.
* Just for fun.... tell us about your favorite specialty ruler.
This is just the first giveaway of the year. I'll be running one or two per month, so keep checking back!
Happy new year, everyone! I hope 2015 is the best year ever for you and those you love.
Tuesday, December 30, 2014
My New Bottle Tree


Monday, December 29, 2014
Festive Treats

I have this great little gingerbread tray that I made at a do-it-yourself ceramic studio a few years ago. I love to make gingerbread men. I've been doing it since my sons were little. This year, I made my gingerbread from scratch, using the recipe in the Betty Crocker cookbook. Sometimes I just use a boxed mix. It's all good. The faces and buttons are just a little confectioners' sugar and a few drops of water. I used a toothpick and dotted the icing on.
But the really fun things were the little marshmallow mugs! I got the idea on Pinterest. (Gotta love Pinterest!)


I make the gingerbread men every year. We love them. But the hot chocolate cups were new this year and were a big hit. SO EASY, too! Oh--- and the rest of the candy canes got smashed to use for chocolate peppermint bark. I forgot to take a picture, but all you do is melt chocolate and sprinkle the chopped up peppermint on top. When it's set, just break it into pieces. Easy peasy!
Subscribe to:
Posts (Atom)